In this video tutorial we will show you how to create invisible clothes on people using Adobe Photoshop.
Tip
1:- While playing click the far right button of the player to select full screen mode for better viewing.
Tip
2:- Use the pause and rewind features if you are finding it hard to keep up with the tutor.
Friday, June 6, 2008
Invisible Clothes
Thursday, May 29, 2008
Fire
HOT!! HOT!! HOT!! This episode is smoking hot. By popular demand, Bert works his magic and shows us how to create fire. It is not quite as simple as lighting a match, but as Bert demonstrates, it is not too much more complicated than that.
Bert has made his source files available for this episode available here
Marquee
Now Playing: PixelPerfect with Bert Monroy. If this show was at a vintage movie theater, that might be the sign on the marquee outside. In this episode, Bert demonstrates how to create a marquee with lettering. The lettering is stenciled on to a thin looking, transparent plastic layer, warped and affixed to the marquee..
Bert has made his source files available for this episode available here
Woodshop and Metalshop
Watch as Bert manipulates filters, among other things, to create (completely from scratch) a wooden plaque with a brass plate that has a name on it.
Wednesday, May 28, 2008
Perspective
A very important thing to keep in mind when you're creating images from scratch or even putting things into existing images is the concept of perspective. Bert goes back to basics to teach this concept, starting with a horizon line and adherence to the rules of mother nature.
Bert has made his source files available for this episode available here
Banners
No, not advertising banners on websites, but banners in the original sense of the word such as described in the current wikipedia definition: "A banner is a flag or other piece of cloth bearing a symbol, logo, slogan or other message." In this episode, Bert shows how to create a banner that is flowing back on itself with ripples using the pen tool that he described in episode 18.
The Pen Tool
The pen tool is a very powerful tool, but a very misunderstood tool and very difficult to use. Bert spends this entire episode teaching just how the pen tool works.
Displacement
It might take Einstein to help explain the complex physics of bending light, but when it comes to bending pixels, it is an art commonly referred to in Photoshop as displacement. Displacement can let you use the lumonosity values of one image to bend the pixels of another; a "relativity" of sorts. No offense to Einstein, but Bert can explain this one on his own.
Colorizing
Bert shows how to take drawings (like comics) and/or black and white photos and apply color where color does not exist. Amazingly simple and very cool.
Colorizing
Bert shows how to take drawings (like comics) and/or black and white photos and apply color where color does not exist. Amazingly simple and very cool.
The Extract Command
Bert demonstrates how to pull things and objects out of an image using Photoshop's Extract Tool.
Drops of Water
The universal solvent takes center stage as Bert demonstrates how to create realistic looking water droplets and explains how in imaging it is important to study reality in order to re-create it.
Monday, May 26, 2008
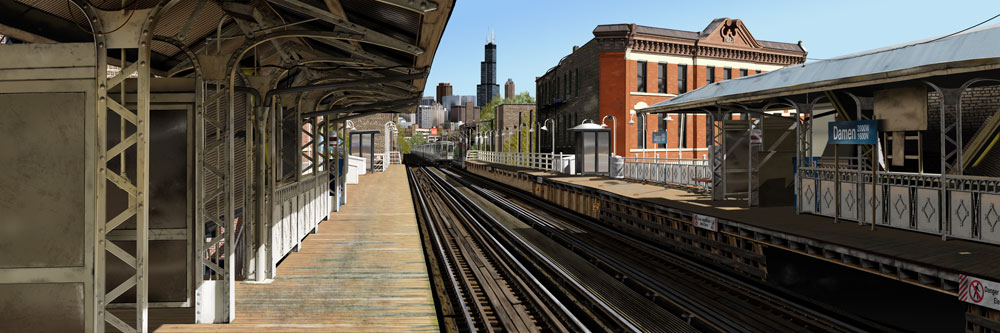
Damen Station
This is the most ambitious digital painting of a Chicago scene unveiled at Photoshop World in Miami on March 22, 2006.
It is a panorama of the Damen Station on the Blue Line of the Chicago Transit Authority.
Adobe Illustrator was used for generating the majority of the basic shapes as well as all the buildings in the Chicago skyline.
The rest was created in Photoshop.
• The image size is 40 inches by 120 inches.
• The flattened file weighs in at 1.7 Gigabytes.
• It took eleven months (close to 2,000 hours) to create.
• The painting is comprised of close to fifty individual Photoshop files.
• Taking a cumulative total of all the files, the overall image contains over 15,000 layers.
• Over 500 alpha channels were used for various effects.
• Over 250,000 paths make up the multitude of shapes throughout the scene.
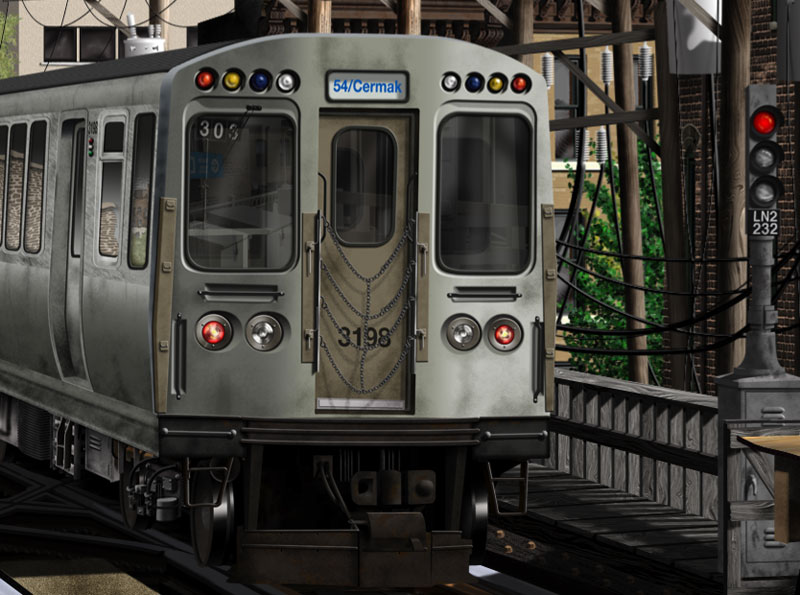
Close-up 1:
The front face of the train was created in its own file. The reflections in the windows were added once the train was placed in position within the overall image.
The side of the train car was created in a separate file. Duplicating that file made it easy to add additional cars.
The duplicates required changing the reflections in the windows, the accumulated grime and the car numbers to make each car appear different.
Close-up 2:
Symbols, text and logos were created in Adobe Illustrator.
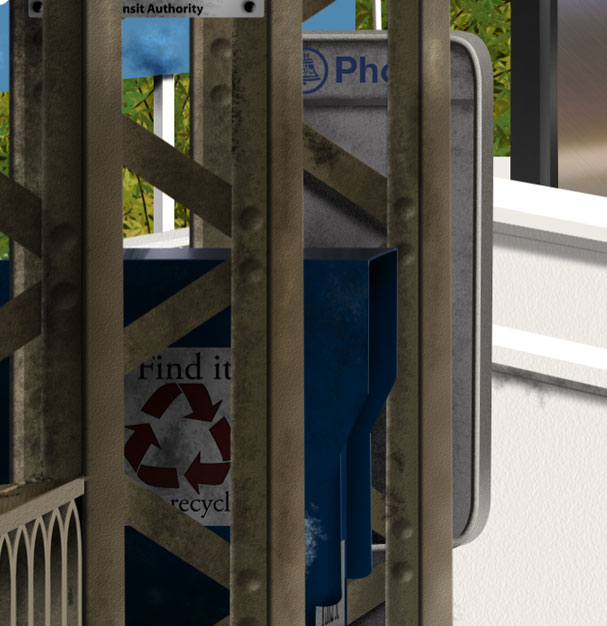
Close-up 3:
The grime was created with Spatter brushes, available within the Photoshop brushes palette, which were modified to randomize the effect.
The rust was created with the same Spatter brushes but with Color Dynamics applied. The rust was in a separate layer that was also given a layer style of Inner Shadow to add the dimensional effect of the rust appearing under peeled paint.

Do You Need More ?
So you have landed to this blog, this is just the beginning. i have hundreds and hundreds of this video tutorials to add , stay tuned and give me some feed back.
Sunday, May 25, 2008
Inside Damen 3 of 3
Bert draws attention to the textures used in his huge digital painting, Damen. See how beams and bolts and all the rusty details within them are created.
Inside Damen 2 of 3
Bert continues with his behind the scenes look at his 1.7GB digital painting, Damen, by demonstrating how his use of Illustrator and vector graphics played a role in the creation of the artwork.
Saturday, May 24, 2008
Inside Damen 1 of 3
Bert explains how his work of art, Damen, has over 15,000 layers and 500 alpha channels by focusing on the level of detail in just a part of the train at the station.
Bert has made his source files for this episode available here.
Layer masks & Alpha channels
Bert uses examples to explain the difference between layer masks and alpha channels. Both work the same way, but for a totally different purpose.
Bert has made his source files for this episode available here.
Type Treatments
There's more to type than just the font. Bert applies a little fluffy, pillowy, and bubbly treatment. What's that mean? Watch the show and find out.
The Ray Gun
Bert delves into the dark side to show off the danger of weaponized digital pyrotechnics.
From the Shadows
In this episode, Bert shows us how to use light, shadows and reflections to change the way an object looks in any given environment.
Making Bling-Bling with Filter Tricks
Make effects by getting creative with filters and combining filters -- the results may even be a girl's best friend.
Thursday, May 22, 2008
The Lamp
October 18th, 2006
Bert explains the thought process that goes into making a piece of art. We'll see a complete project and then focus on Bert's attention to detail in creating a lamp in the corner of the larger piece of work using textures, layer styles, and the warp feature.
Photoshop Reflections
Bert creates reflections from scratch this week with the help of the distortion filter.
This week, Bert adds the illusion of a reflection on an image with three simple methods. First, Bert simply creates a reflection by adding an existing image and adjust the opacity. Second, Bert distorts an image of a ball and match by using the distort: spherize filter. Third, Bert creates a reflection from scratch by using the pen tool and various layer styles.
Don't forget to design and e-mail Bert a background for our green screen! Please send a jpg design with size 1280x720 pixels
Subscribe to:
Comments (Atom)


